Dont let the internet intimidate you — Procreate is very beginner friendly. It is, in my opinion, the best digital art app to start out with because of how easy it is to operate. When you’re learning how to use procreate, there are some important factors that come into play.
My goal is to tell you about things that will benefit you that the procreate app and video will not tell you. Hacks that I found to be beneficial, without using the technical terms. For example, I had no idea what a “clipping mask” layer was, but I wanted to know how to color inside the lines every time. I will help you with that!
Let’s make sure we’re all on the same page first…
Procreate is an iOS app primarily used on the iPad. It is Apple user ONLY, unfortunately. You can download the pocket version on your phone, but the best version is the original on iPad. You will most definitely need to invest in an Apple Pencil as well. It really makes a big difference, I promise.
The Apple Pencil acts as a real pencil, pen, or paintbrush. It responds to how much pressure you apply, what angle the pen is being used at, etc. You are even able to customize these features!
So, everyone that is reading further knows that:
A) you need an iPad
B) you need an apple pencil
C) Procreate is $10, but you only pay once.
Honestly, thats my favorite thing about procreate. It isnt a subscription! Too many digital platforms, like adobe for example, are monthly subscriptions that can end up running you a lot of money each month. You avoid that with procreate.
Now that we have that covered, we can proceed with the things you need to know upon downloading.
What you NEED to know about formatting on procreate
Procreate is a PIXEL based format. Now, chances are if youre starting out in digital art, you dont know what that means. If you dont:
There are two main kinds of formats in the art world for digital creators. Pixel based, and vector based. If you want to create things to sell, market, or create a service to make money as a digital artist, you need to know these.
So, like I said, procreate is pixel based. This means that if people are wanting to make logos, you need to convert to vector format so that they can change the size without it looking pixelated or blurry. Then you can make the logo as big or small as you want without worrying about pixelation. This is a really easy process, and I will have another post on how to do that soon.
Vector format is great for when you’re making logos or large solid designs that will be “blown up”. I have also used it for doing vinyl wraps and stickers for vehicles that clients have hired me for. However, I always start with pixel based on procreate.
The reason why pixel based is good to start with is because you can actually draw like you normally would. With vectors, you have to draw the lines in, or code them in. If you draw on procreate, you can then convert it into a vector afterwards. It doesn’t usually come out exactly how you had it, it is hard to use shading and texture on vectors. But, it still works a lot better for me (someone who needs to draw something first). So, keep that in mind.
Not to mention, I already have posts about using procreate to make posters, what format to do it in, etc.
Things to know when downloading procreate:
Dont get overwhelmed with all of the types of brushes. I remember trying out every single one when I first got it and then not knowing where to start with my work because the options were too diverse. Start slow.
For example, what is your typical medium aside from digital? Do you sketch? Focus only on the sketch/pencil options available and feel out what you like best. I started with the procreate pencil and used that for over a year, but realized that I actually really like the 6B a lot more. Chances are, you are going to stick to one or two brushes from each category and not stray too far, so just get a good feel.
Focus on getting used to the brush. Make sure that you are adjusting yourself to the pen and the way it feels. If you dont know how to do that, then you’ll never get anywhere!
Check out all of the different buttons. Make sure you get acclimated to the different buttons that are available on the screen inside of a canvas. From left to right: actions (the wrench), adjustments (the wand), selection tool (the “s”), and sizing tool (the mouse). Then, on the other side, of course your paintbrush, the pointer finger (which is your blending tool), your eraser, and the color wheel.
Something else you should learn early on. If you like to use other pieces as a point of reference, especially for color wheels, get used to importing images. In the action tool, import images and then use the color grabber.
The most important things you need to know as functions
What layering can do for you:
Layering is one of the most important tools on procreate. And, procreate does a great job of introducing you to it for when you move on to other illustration apps and tools for work or more detailed fun.
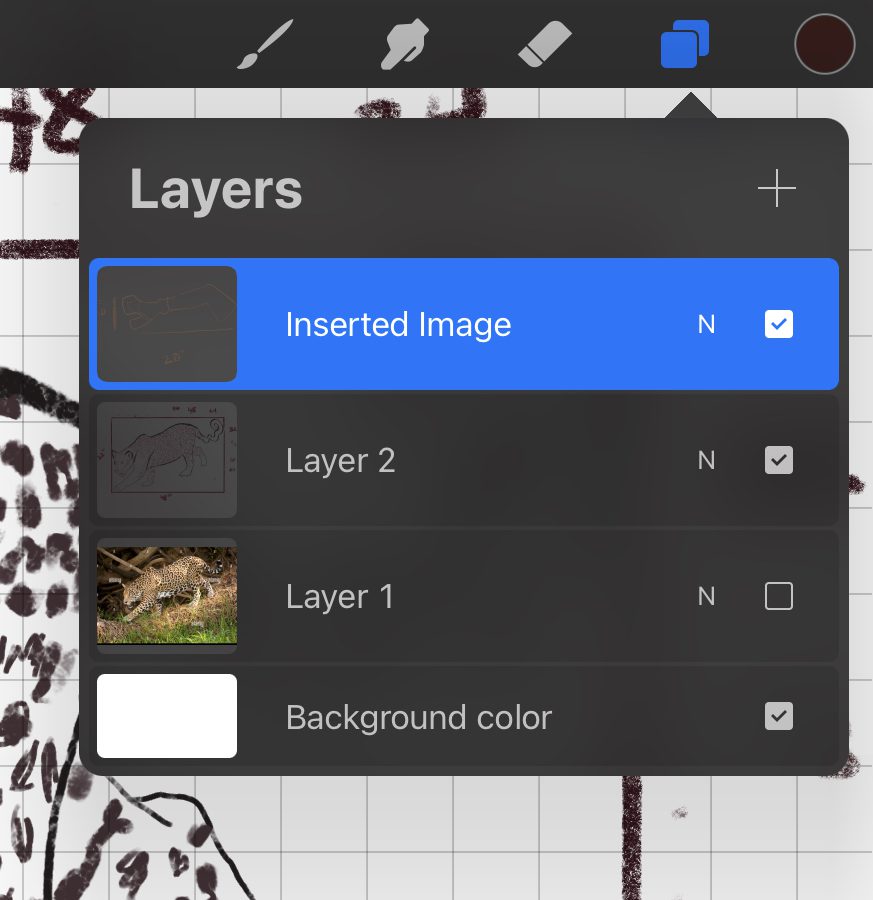
Layering is when you have multiple “sheets” of paper or canvas on top of each other. If you have one layer on top of another, you can trace over that first layer, and then remove it so that you are left with just your tracing. This is really helpful if you are trying to size something properly or get a rough idea of what you want your artwork to have.
You can also click on the “N” on each layer, and change the opacity of the layer. For example, if you wanted the picture to look more orange, but just a touch, add a layer of orange color and turn down the opacity to 10%.
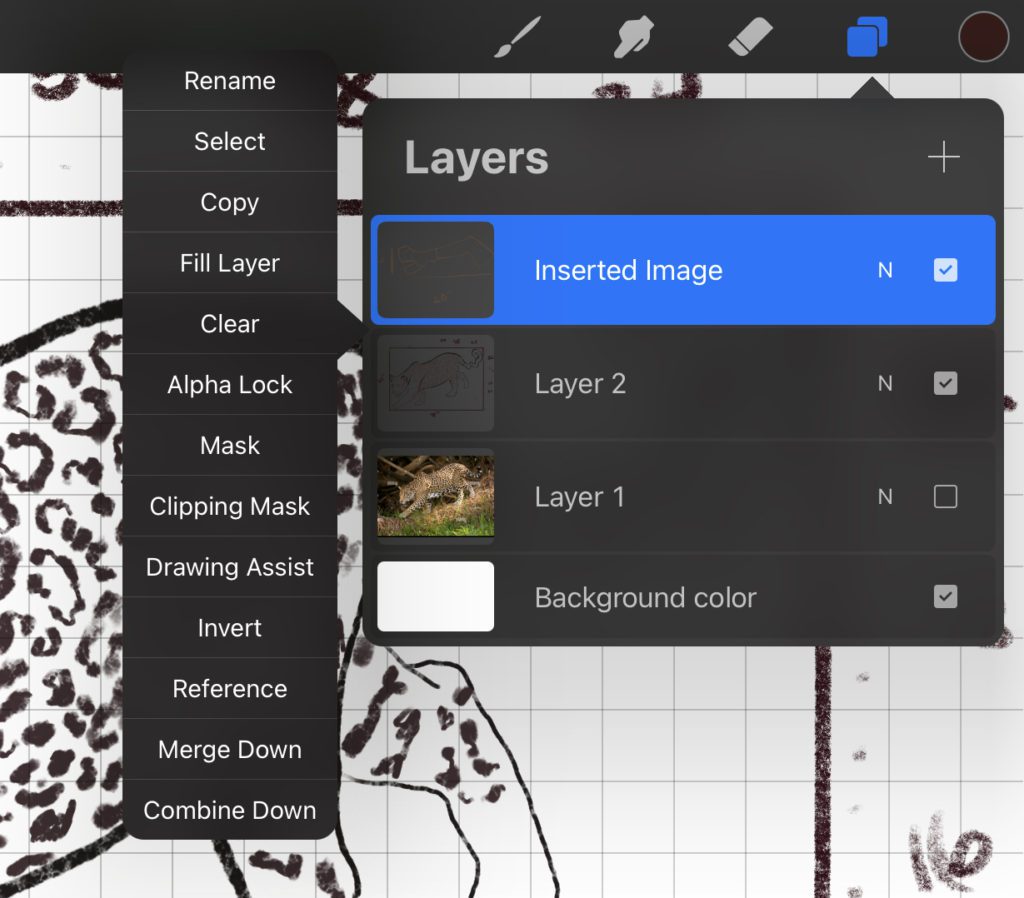
Here is an example of how I traced a jaguar image, and then made my own and was able to size it to what size I would make my real piece. I ended up painting this on wood and tracing a real jaguar helped me to get the lines that I needed to replicate it on canvas.
- Time-Lapse Recordings:
- Procreate records your actions on each layer, allowing you to create a time-lapse video of your artwork’s creation, which can be great for sharing your process on social media or learning from your own work.
- Organization:
- Layers help you keep your artwork organized. You can separate different elements, such as the background, characters, text, and effects, onto different layers. This makes it easier to manage and edit each component.
- Blending and Transparency:
- Each layer can have its own opacity, blending mode, and layer effect, giving you control over how layers interact with one another. Blending modes can create various visual effects, such as shadows, highlights, and textures.
- Isolation:
- You can isolate specific elements by working on individual layers. This is particularly useful when you need to make detailed changes or apply special effects to a specific part of your artwork.
What clipping masks can do for you:
Clipping masks are useful for a variety of purposes in digital art. Here are a few examples of what you can do with clipping masks in Procreate:
- Create complex shading and highlights by using a clipping mask for a layer of shadows or highlights over a base color or texture layer.
- Apply textures or patterns to specific areas of your artwork without affecting the entire composition.
- Add details, such as patterns, textures, or designs, to clothing, objects, or characters in your artwork.
- Combine multiple layers of artwork to create intricate and detailed compositions.
Clipping masks are something that l wish I knew much earlier in my procreate journey. Clipping masks are basically the same thing as a layer, but one step further. The layer becomes only what the shape you have drawn is. Let me explain:
Try drawing a circle. Wait, of no! You realize you dont like the color you have, and when you “pour” a new color from your color palette onto it, it doesnt come out right. Clipping masks will help!
Simply add a new layer to the canvas that is blank on top of the layer you want to change the color of. Then, click “clipping mask” from the selection of options from the layer:
Now, when you draw on that new layer, it will only show the color where the layer before has markings. So, if you drew that circle and then made a new layer on top and selected clipping mask, it will attach to the layer with the circle and only show your new drawing within the circle!
What color dropping will do for you:
In the top right corner of your ipad in procreate, there is your color wheel. Whenever you are looking for a quick solution to change a solid color, key word solid (this will not work with textures), you can drop a color in. You do this simply by dragging the color that you have displayed in the top right corner to the area that you want filled. It works pretty instantaneously.
Using Procreate Palettes
This is something that has come in really handy when I am looking for inspiration or a color scheme that creates balance instead of a mess. If you are not too keen on color theory, or creating palettes, this tool will be very beneficial to you.
I already have a post regarding how to make palettes on procreate with images that you already have, and you should start there. Is there a famous work that you love the color palette of? Are you looking for themed colors and dont know where to start? Just go on google, look up your desired palette (preferably in a real photo such as “winter in New York” instead of looking up a palette itself) and insert that image to procreate with the steps that I have listed in the post hyperlinked above.
Cropping on Procreate
I actually have a full post that gives a step by step on how to crop properly on procreate without messing up, or cutting off, your work. It’s an important step for learning to make sell-able digital artwork.
FAQs
Is Procreate easy for beginners?
In my opinion, it is one of the best apps for beginners. It is very easy to figure out how to use brushes and to simply just draw. Then, from there, you can learn to add in more touches of what digital art can offer, and it is essentially a gateway into the digital art world.
Is procreate a one time purchase?
Yes procreate is a one time purchase. You only pay for it once in the App Store. It is superior to other apps because of that, such as adobe illustrator which you pay for monthly.
Are there famous artists that use procreate?
Yes! There are a lot of famous artists that use procreate. Here are my favorites:
- Terry Urban: He is a neoexpressionism artist that specializes in mixed media canvases. However, he makes a lot of prints and uses procreate for this! He also uses o procreate for all rough drafts of his pieces. Even if you are an artist that prefer to paint in real time, you can learn from terry urban how to start off with your drafts and double check your palettes before taking it to the canvas.
- Stefan de Groot: Stefan de Groot is an artist that has long since been working on cartoon artwork. He founded Creative Cave, his own company. He makes comics, animated shorts, and all forms of graphics, and procreate is his medium of choice because of its simple and complex stop motion abilities.
- Bobby Chiu: Not only has he worked on massive projects such as Tim Burton’s Alice in Wonderland, but he has very creative digital paintings that are worth checking out. He founded Imaginism Studios, is a very expressive procreate artist.
Comments are closed.