If you are a painter, whether that means watercolor, acrylic, oil, gouache, mixed media, or anything else, underpainting is for you. When I learned how to affectively underpaint for my canvases, it changed the game for me. Not only did it improve the appearance of the paintings, but it made the process to the end result much more achievable and easier to visualize. In this post, I am sharing what underpainting is and how you can use it to your advantage.
First of all, what is underpainting and what does it do?
Underpainting is a preparatory layer or initial layer of paint applied to a canvas or surface. Also, this is done before the artist starts working on the final layers of a painting.
The purpose of underpainting is to establish the foundational elements of the artwork. For example, composition, tonal values, and sometimes even the basic color relationships. There are many different underpainting styles.
Underpainting helps the artist to paint out their idea without using too many mixed hues as a distraction. It allows the artist to focus on the composition, texture, lighting, and body of the piece.
1.) Types of Underpainting:
Some of the most popular are for oil painting and acrylic painting, but any painter with any medium can underpaint and should. First, one of the most popular kinds are imprimatura (thin stained monochromatic layers). Second, just as equally popular if not more is Verdaccio underpainting (muted flesh toned yellows and greys). Third, and also just as important to know is grisaille (black and white bases to emphasize light patterns with no color distraction).
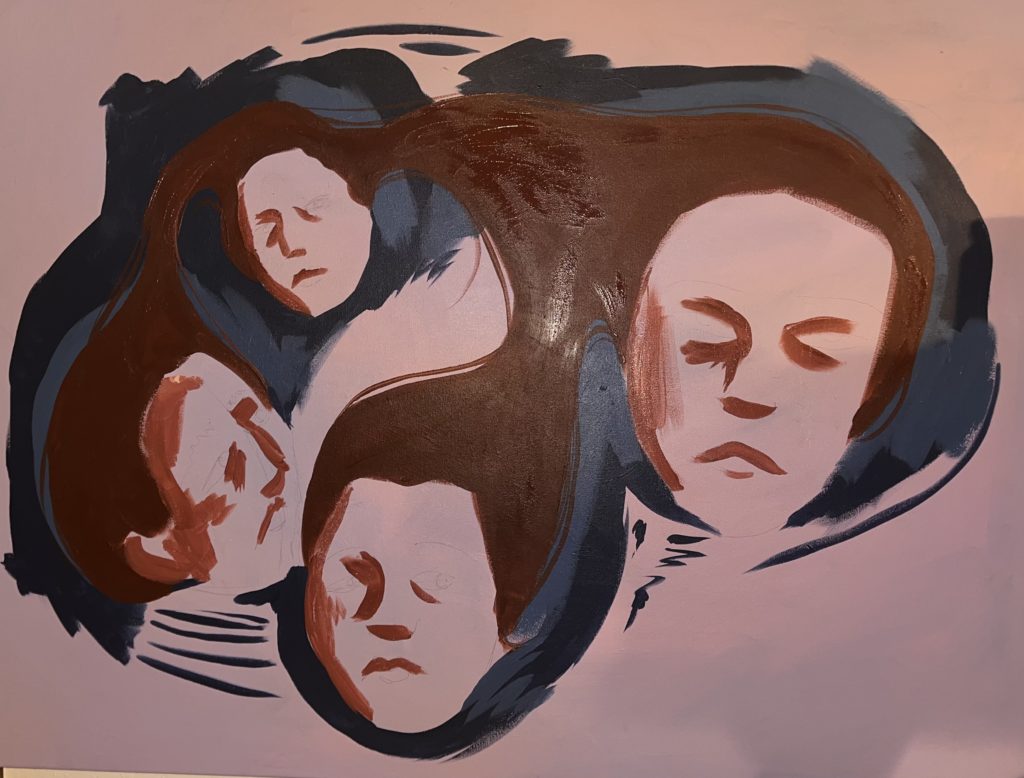
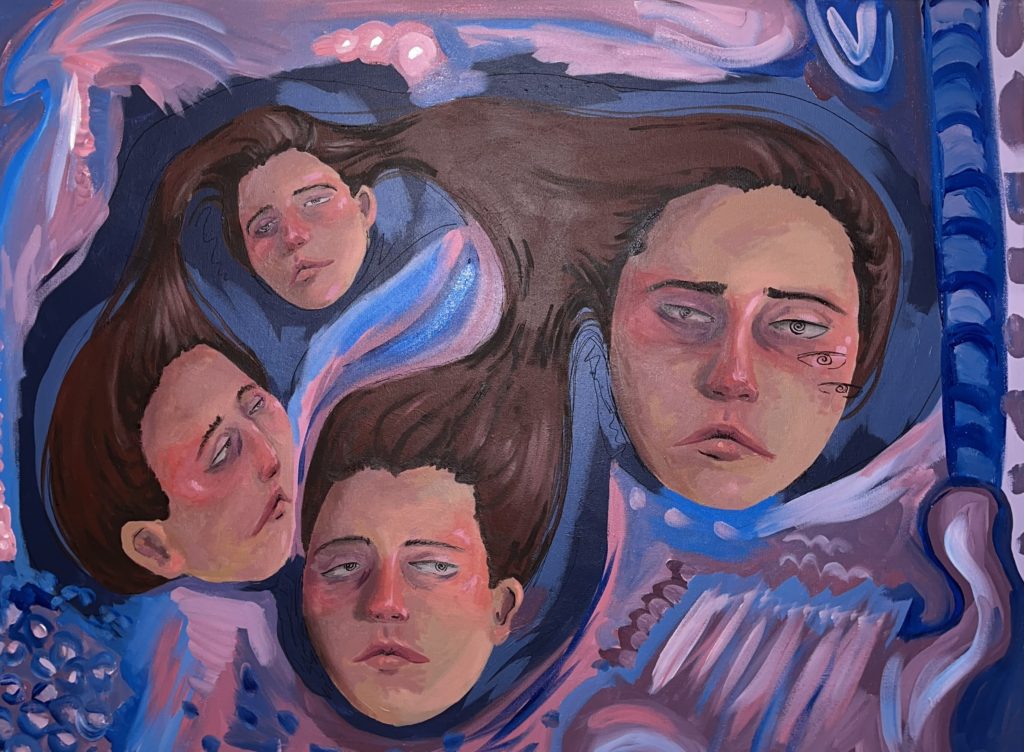
Here is an example of an underpainting before and after with my work:
2.) The Importance of Thin Layers:
Since underpainting isnt meant to be a finished product, it’s important to start light. This way, if there is anything you want to change, it is easier to do so. First, people tend to run into this problem a lot with sketching.
This approach enables better control over the development of values, colors, and details. Also, it allows for adjustments as you progress.
Thin layers help prevent the colors from becoming muddy or overmixed. If you apply thick layers too quickly, the paint may blend in ways you didn’t intend, resulting in a loss of clarity and definition.
Thinner layers dry more quickly than thicker ones. This can be advantageous, especially when you want to move on to subsequent layers or make adjustments sooner. It also reduces the risk of smudging or unintentional blending.
How do I create the thinnest layers with acrylic paint?
- Dilute with Water or Medium for faster drying and the thinnest layers:
- Acrylic paints can be thinned with water or acrylic mediums. Mix a small amount of water or medium into the paint to achieve a more fluid consistency. Then, this makes it easier to create thin, translucent layers.
- Use Retarders if you want slower drying and the thinnest layers:
- Acrylic retarders can slow down the drying time of the paint, allowing you more time to work with thin layers. This is particularly useful when blending or working on larger surfaces.
- A retarder is usually a glycol which is added to water, that is used to slow the drying time of acrylic paints.
- Apply thin layers one at a time, allowing each layer to dry before adding the next. This step-by-step approach allows for controlled development and adjustments.
How do I create the thinnest layers with oil paint?
- Use Thinner Mediums:
- Thinning oil paint can be done with oil mediums. A good example is linseed oil or odorless mineral spirits. These mediums increase the flow of the paint and facilitate the application of thin layers.
- Consider Fast-Drying Mediums:
- Some oil painting mediums are formulated to speed up the drying time. These can be beneficial if you want to build up layers more quickly while still maintaining control.
- Layering Techniques:
- In oil painting, the “fat over lean” principle is often followed. This means that each subsequent layer should have more oil content than the previous one. The leaner start would simply be a thinner layer, and slowly add more paint to each layer as you go!
- Glazing Techniques:
- Glazing involves applying thin, transparent layers of color over dried underlayers. This technique is effective for achieving subtle color variations and luminosity in oil paintings. Galkyd mediums are popular for glazing.

3.) Color Experimentation:
One of the most popular reasons that underpainting is widely used today is because of what it does for the color composition of a painting. The color palette you choose at the underpainting stage sets the foundation for the entire painting. It influences the mood, atmosphere, and visual impact of the final artwork.
Think about how the color wheel relates to itself. If you are looking for a bold painting, you might want to choose an underpainting that is very different from the color composition to add some more bright dimensions. If you want a calm painting, you might want the colors to not overpower each other.
The color palette established in the underpainting serves as a guide for subsequent layers. It helps maintain a sense of intentionality and prevents the introduction of conflicting colors in later stages.
By using specific colors in the underpainting, you can draw attention to focal points within the composition. Whether through contrast or strategic color placement, the underpainting stage helps guide the viewer’s gaze.
4.) Mapping Shadows and Highlights:
This is my favorite use of underpainting. When I am able to map out where my shading is on the canvas, and where my highlights are, it makes it so much easier to match shades.
When I am underpainting, my main concern is making sure that the dimensions look accurate with this. I personally find it much easier to see color in a painting, but hard to see the dimensions and shading. So, in making a monochromatic underpainting, I can really look at the shadows and highlights without color interfering!
Planning shadows and highlights in the underpainting stage contributes to time efficiency. It provides a roadmap for subsequent layers. This allows you to work more efficiently and make informed decisions about where to intensify values and add details.
5.) Defining Shape of Figures:
Sometimes, when painting, you cant truly see what your figures look like until theyre on the canvas. Just because they looked good in the sketch beforehand doesnt mean they will come out the same the second time! Underpainting can greatly help with this problem.
First, since you underpaint with such thin layers, you can easily cover over a figure that does not look right. Underpainting serves as a guide for maintaining accurate proportions and placements of shapes and figures. It helps artists ensure that elements are well-positioned and properly scaled within the composition.
Secondly, artists can use underpainting to test and refine the composition and arrangement of shapes. This stage allows for experimentation with the placement of figures. This ensures a harmonious and visually pleasing arrangement.