
Procreate is a digital illustration app that is designed for tablet use, and in most cases, the iPad. There are almost unlimited options for tools and features to use. I feel very comfortable giving an accurate procreate review that fits the criteria of a fine artist that needs assistance with their painting process.
I have been using procreate for a few years at this point. After having some expereince, I feel that I can provide an adequate review. There are certain things I love about procreate, and others I do not.
This post will contain a procreate review that covers all of the basics for anyone that is using it as a beginner, or branching further.
The main reason I use procreate is for aiding my painting process. It is great for being able to project my digital ideas onto the canvas. It is also great for helping me to create color palettes, and visualizing my work before it goes onto a canvas.
Brush Customization
Procreate offers a wide range of brushes. You can customize each brush to suit your needs. You can adjust the brush size, shape, opacity, and more.
Not only can you customize the tens of brushes available to you, but you can purchase “brush packs” that other artists sell. This means literally an unlimited amount of textures and styles for you to use with your Apple Pencil.
I really do like how many brush options there are on procreate. I think the more abstract it ventures though, the more tacky the brushes. Maybe this might the opinion of someone that prefers fine art techniques, but still.
In particular, the cloud brush as well as some of the other brushes in the “organic” category are more of just a pattern/sticker. Also, under the “water” category, the blotch and water drip are just straight stickers that do not come out at a fast rate when applied.
I was hoping for a true to texture water consistency that could give the appearance of really soaking the page. However, these are just critiques and complaints about brushes, and I am sure there are packs that people sell that are quite excellent for these textures.
Overall, I think that the brush textures are very easy to work with. I find them to be simple enough for you to figure out easily (regarding the opacity and thickness, etc).
Layering
Layering was a bit more tricky for me to figure out to be honest. On procreate, like many other digital art programs, you can add different layers to your canvas for things to overlap or to provide more density.
It took me a bit of time to figure out the layering to my advantage. I think that one of my favorite features when it comes to layering has to be the clipping masks. You can add a layer on top of another layer, that when you color on the new layer, it only affects the area that had been brushed over in the under-layer.
I dont think that layering is something that procreate could really make simpler. The main problems that I have had with layering has all been user error. However, I do wish there was a way to remind myself when to start drawing on a new layer so that later on I am not realizing I have to go back and correct a mistake.
Something that can be tough with the layers is if you make a little scuff in your work. Say that you have ten layers down, and you don’t know which one of them had the little pencil mark in the corner that you don’t want there. I am sure this is something you can look up to how to fix on the internet, but it took me a while to figure it out and even be able to search the right thing.
Exporting Options
Procreate is a pixel based format when drawing. You are able to work in real sizes, which I explain in my post about digital posters. There are many exporting options when using procreate:
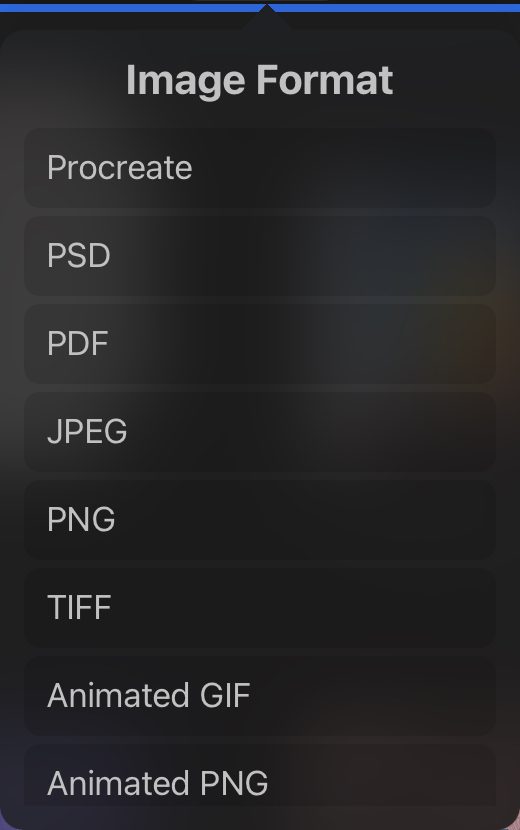
Not only does procreate give you the option to even save your moving pictures and illustrations as GIFs, but you can also make a layered tiff. The reason why this is great is because you can then convert over to a vector based format, which is essential for big-scale printing.
Procreate Colors
My favorite thing about procreate is how it aids me in my painting. When I am looking at a reference photo, I am able to toggle over the color from the image and get the exact shade. Not only does it give the shade, but it also tells me where it comes from on the color wheel including the value and hue.
Even more specifically, the best feature that is exhibited through the procreate coloring is the palette options. I also have a post regarding how to use the procreate palette options to your advantage.
The Cost of the App
Procreate is available for purchase on the App Store for iPad. Once you purchase the app, you will have access to all of its features and updates. As far as price, it was $9.99, which I think is a great deal for what you are getting.
I think it is definitely worth the money considering how much I am willing to spend on physical art supplies, and this is a one time fee. Which is something that you cannot even say for adobe featured products that have monthly subscriptions.
Comments are closed.